Saturday 25 January 2014

UOIT Game Dev - Development Blog 3 - Shading techniques ...and Glow!

What we've covered...

Alright, so this week we've gone through the following shading techniques:


Emissive: emits light or simulates light originating from an object.

(http://udn.epicgames.com/Three/rsrc/Three/Lightmass/SmallMeshAreaLights.jpg)

Diffuse: a light ray that is cast and reflected from a surface and scattered into different directions
(http://www.directxtutorial.com/Lessons/9/B-D3DGettingStarted/3/17.png)

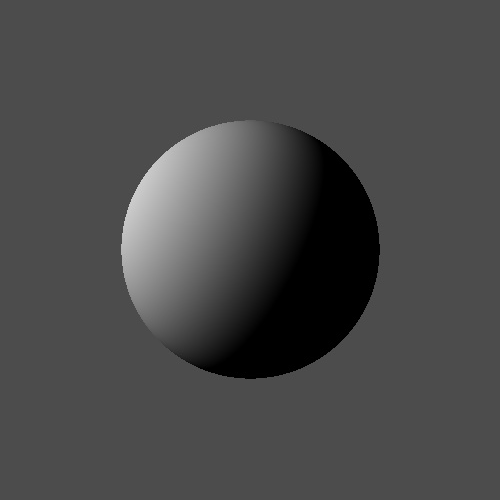
Ambient: Basically, a really simply hack to simulate light bouncing around or "light that is always there". It is lighting that lights up the model even when there are no lights around.
(http://zach.in.tu-clausthal.de/teaching/cg_literatur/glsl_tutorial/images/dirdiffonlyvert.gif)

Specular: it shows a bright spot of light simulating light reflection. It is often used to give surfaces a metallic or reflective look.
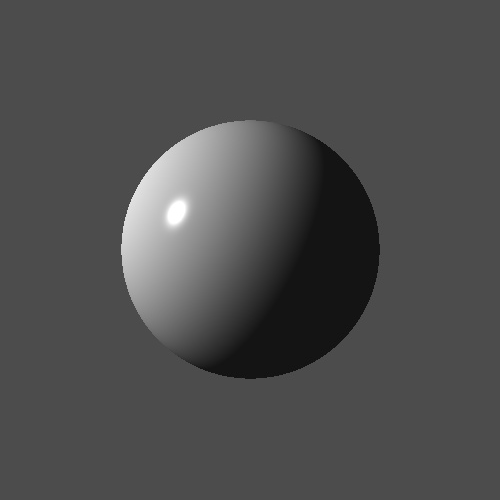
(http://www.directxtutorial.com/Lessons/9/B-D3DGettingStarted/3/19.png)

Also, the last 3 techniques are combined to make the "phong" shading model 
(http://tomdalling.com/wp-content/uploads/800px-Phong_components_version_4.png)

By adding all of these components together, we get a nice reflection which is a basis for most lighting techniques. 

The math...

To perform light calculations you'll need components like a vector's normal vector, light source position, view direction, reflected light vector (there's way more but these are just the most common ones).

Diffuse  is done by taking the dot product of the normal and light direction vectors. This will give you an intensity from 0 to 1 which you multiply with your final color. values closer to 0 will give a darker color while values closer to 1 will give you a brighter color. 

so it should look like : DiffuseLight = N dot L * DiffuseIntensity;
and of course you can factor in a intensity variable shown above to adjust how bright it would be. 

Specular is done by obtaining the reflected light vector then getting the dot product of the view direction and reflected light vector. Once our view direction gets closer to the reflected light, the value becomes closet to 1, which is how we get that spot of light on a surface.

SpecularLight = pow((R dot V), SpecularShininess);
in this one you can factor in a shininess variable, and set the specular value to the power of a certain value to intensify it. 

Ambient is the easiest of them all, all you'll need to do is hard code in a set color value like (0.1,0.1,0.1) and you're done! this allows the object to be lit in areas where there is no light present. 

AmbientLight = vec3(0.1,0.1,0.1);

then you just add them all together to get the final color.

FinalColor = AmbientLight + DiffuseLight + SpecularLight;


We've also covered toon/cel shading which is pretty interesting..

(http://dailyemerald.com/wp-content/uploads/2013/09/Wind-Waker-Windfall.jpg)

Toon shading isn't really difficult, you're just doing the same shading techniques like the ones mentioned earlier however the final color values are clamped into specified ranges, giving that cartoony effect. 

Now back on the development side...

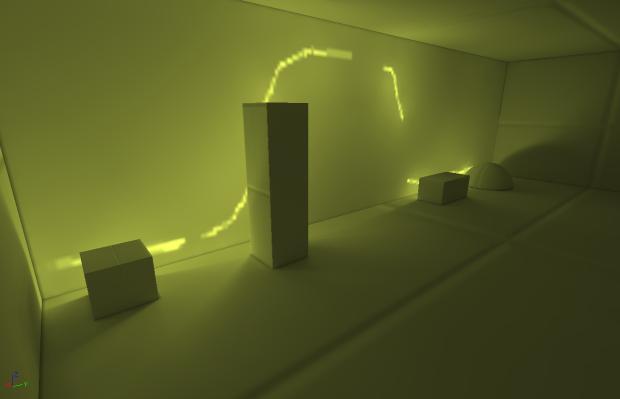
We really need nice glow and holographic effects for our game since it takes place in a vibrant night city. 
I've done a bit of research and came across this article
(http://www.gamasutra.com/view/feature/2107/realtime_glow.php)

after reading it, I found it to be actually pretty simple. I've come up with a few ideas...

Here's what I did.

Have 2 different types of textures, 1 regular texture and 1 glow texture.

(Kevin Pang's shotgun texture)
(for glow texture, all black pixels won't glow)

Create multiple frame buffers to store the glow and blurring post processing effects.
This will need multiple draw passes

Pass 1: render all geometry with the glow texture applied


Pass 2: Ok now blur everything using gaussian blur (this step actually takes 2 passes to blur things horizontally then vertically)


Pass 4: Render objects normally with normal textures


Pass 5: Apply the final glow frame texture onto the regular scene frame and BAM

My group members including myself agree that it makes things pop a lot more, and I'm quite happy with this effect. 


(hologram test lol)

I'll be looking forward to using this effect in my night city. Well, that's all for this week, later!


Sunday 19 January 2014

UOIT Game Dev - Development Blog 2

What we've learned this week...

This week we've been covering the graphics pipeline, along with VBOs and FBOs.

The graphics pipeline consists of several stages. You create your vertices or have it loaded from an object loader, store them into an array and send it off to the vertex shader. The vertex shader will then convert the vertices into screen space by multiplying it with the projection and view matrix. Once that's done the vertices will be assembled into primitives forming a shape which will then be rasterized into a 2D image. Next, the fragment shader will sample textures with UV coordinates to fill in the pixels with rgb color values. Then finally, the result will be displayed on the screen framebuffer.

What's beautiful about this pipeline is that it allows a programmer the flexibility to modify and affect the resulting image by changing the way this pipeline affects an object's vertices or the object's lighting through the use of mathematical algorithms conducted with the vertex attributes (position, normals, uvs) .

Our framework uses custom shaders to render various lighting techniques like phong, diffuse, and lambert shading.

VBOs (Vertex Buffer Objects) allow vertex data to be stored on video memory for easy access without having to send it over each frame. There are many methods to store vertex data in these buffers, a common way (the way our framework is currently doing it) is creating 3 separate buffers for the position, normals and uvs.

glGenBuffers(1, &tempMesh.vertexbuffer);
glBindBuffer(GL_ARRAY_BUFFER, tempMesh.vertexbuffer);
glBufferData(GL_ARRAY_BUFFER, tempMesh.vertices.size() * sizeof(glm::vec3), &tempMesh.vertices[0], GL_STATIC_DRAW);

glGenBuffers(1, &tempMesh.normalbuffer);
glBindBuffer(GL_ARRAY_BUFFER, tempMesh.normalbuffer);
glBufferData(GL_ARRAY_BUFFER, tempMesh.normals.size() * sizeof(glm::vec3), &tempMesh.normals[0], GL_STATIC_DRAW);

glGenBuffers(1, &tempMesh.uvbuffer);
glBindBuffer(GL_ARRAY_BUFFER, tempMesh.uvbuffer);
glBufferData(GL_ARRAY_BUFFER, tempMesh.uvs.size() * sizeof(glm::vec2), &tempMesh.uvs[0], GL_STATIC_DRAW);

However, I decided that I'm going to interleave the data storing it in 1 single buffer after hearing about the benefits of it during Dan's tutorial. So soon enough, I should have 1 buffer that contain the vertex data in this fashion [position1, normal1, uv1, position2, normal2, uv2, position3...]

FBOs or (Frame Buffer Objects) is essentially a location in video memory that stores color data (rgb values). These can be used for many various shader effects like shadow mapping and all the cool post processing effects like bloom, motion blur, glow and shadow mapping.

I plan on using the the post processing method discussed in this article to create a glow effect for our night city level. http://www.gamasutra.com/view/feature/2107/realtime_glow.php

On the development side...

My challenge for the week was blending and running 2 different animations into 1. Our shooter game like many 3rd person shooters involves having the upper body animate independently from the legs much like Nathan Drake from Uncharted. Basically, we need to allow the character to reload, shoot or switch weapons at any time while running or walking without interruption.

This was not an easy task as we can't simply just replace the upper torso bone transformations with the second animation skeleton. If 2 animations have different transformations with the spine bone, the animation would have an unnatural torso offsetting from the legs.

Instead, I just decided to replace the torso bones local transform with the new animation bones, then peform forward kinematics again each frame reconstructing the skeleton. This has allowed the animator to make any upper body animation they'd like and still have the spine body connect with the legs without having an offset.

Thursday 9 January 2014

UOIT Game Dev - Development Blog 1

Welcome to my very first blog post about my second year university experience in the Game Dev program at UOIT. I will be posting a blog per week for the next 10 weeks regarding the things I've learned in our graphics class and the development (graphical side) of our game. I hope you enjoy :)

After a good long winter break, I feel refreshed and ready to start learning new things. This year is off to a good start, none of our group members have dropped out so our studio is still still intact.

We've been working on a game since September called "Project Horizon". This game features a guy running around with a sword in a futuristic floating city.


As you can see there are already some shading techniques used in this demo such as shadow mapping and bloom. However there are still a lot of things lacking such as multiple lights, normal mapping, bump mapping etc. So I was excited to start our second semester intermediate graphics course.

After a brief introduction to the course, we were taken through the syllabus and then after we were revealed the homework questions. Knowing that our year has only slightly touched on shaders I expected the questions to only contain the basic textbook fundamentals like phong, reflection, multi-lights etc. BUT much to my surprise some of the questions involves very interesting shading techniques that got me very excited like:

Ambient Occlusion

Motion Blur

and

Fluid Dynamics?! (Woah)

Needless to say I am very excited to learn and implement all of these techniques into our game and this class automatically became my favorite course of the semester.


Back on the development side, knowing that we only have 4 months remaining, we have decided to re-scope our game. Instead of traversing through a large linear level, the player would be fighting waves of enemies in a smaller arena like level. This re-scoped game has sprung up a new issue, and it is that the framework must be able to handle large volumes of enemies at the same time. The problem with this is that the skinning operations is quite expensive on CPUs.

While this was good for what we imagined before (few enemies along the linear path), sending thousands of vertex data every frame wasn't exactly efficient. 

As a simple stress test, I tried to run as many copies of our characters at one time. The results were very poor, the game was only able to support a maximum of 4 characters before the frame rate drops. This was bad.

So I finally decided to look into GPU skinning, and it turns out not to be all that difficult! It only requires you to send the mesh and weights data over once, and simply uniform over the bone matrix transformations each frame. Then within the vertex shader, multiply each vertex with the appropriate bone transformations along with the corresponding weight factors. 

Thats it! and boom now we can have 16 characters (each with over 3000 vertices and 37 bones) and still run at a good frame rate. Our enemies contain much less polygons and bones, and with a few adjustments we should be able to hopefully handle over 30 enemies at one time. 


For future implementations, I plan on adding motion blur when turning the camera, glow for our night level, normal mapping along with bump mapping for surface detail, ambient occlusion and hopefully various particle effects for our enemies.