Monday 31 March 2014

UOIT Game Dev - Development Blog 10 - The art of Journey


For a long time I have been amazed and captivated by the unimaginably beautiful art style of TGC's playstation 3 title "Journey". The game features a robed figure that players control to explore different types of terrain in different climates and the purpose is to reach the peak of the mountain seen in the distance. The gameplay mechanics mainly revolve around simple platforming and collecting pieces of scarves. 


It was one of the few games I have come across which art style and graphics had brought so much emotion to a player. To me it felt like a disney movie, the design that went into this game was truly beautiful.

So I wanted to look up how the rendering was done for terrain and I've come across several sources including a power point presentation from TGC. 


And not surprisingly, the process takes several steps.

- Heightmaps 


There are actually 3 types height maps used. A single 256x512 artist generated image was used for generating the terrain, this was done by using B-Spline interpolation to smooth out the hills during real time. I found this to be a really clever way to avoid using a massive resolution height map as it could take up a lot of space. Detail height maps were used to create the ripples in the sand, various types of tiled maps were interpolated between to give the terrain more unique details. And a 3rd type of height map was used to create sand waves.


- Diffuse Contrast


A modified version of the Lambertian model was used in the final product, the Oren-Nayar model helped bring out more contrast out of the terrain.

this is the shader code used:

half OrenNayarDiffuse( half3 light, half3 view, half3 norm, half roughness )
{
    half
VdotN = dot( view, norm );
    half
LdotN = dot( light, norm );
    half
cos_theta_i = LdotN;
    half
theta_r = acos( VdotN );
    half
theta_i = acos( cos_theta_i );
    half
cos_phi_diff = dot( normalize( view - norm * VdotN ),
                             normalize( light - norm * LdotN ) );
    half alpha = max(
theta_i, theta_r ) ;
    half beta = min(
theta_i, theta_r ) ;
    half sigma2 = roughness * roughness;
    half A = 1.0 - 0.5 * sigma2 / (sigma2 + 0.33);
    half B = 0.45 * sigma2 / (sigma2 + 0.09);
   
    return saturate(
cos_theta_i ) *

        (A + (B * saturate( cos_phi_diff ) * sin(alpha) * tan(beta)));
}

- Sharpened mip-maps 


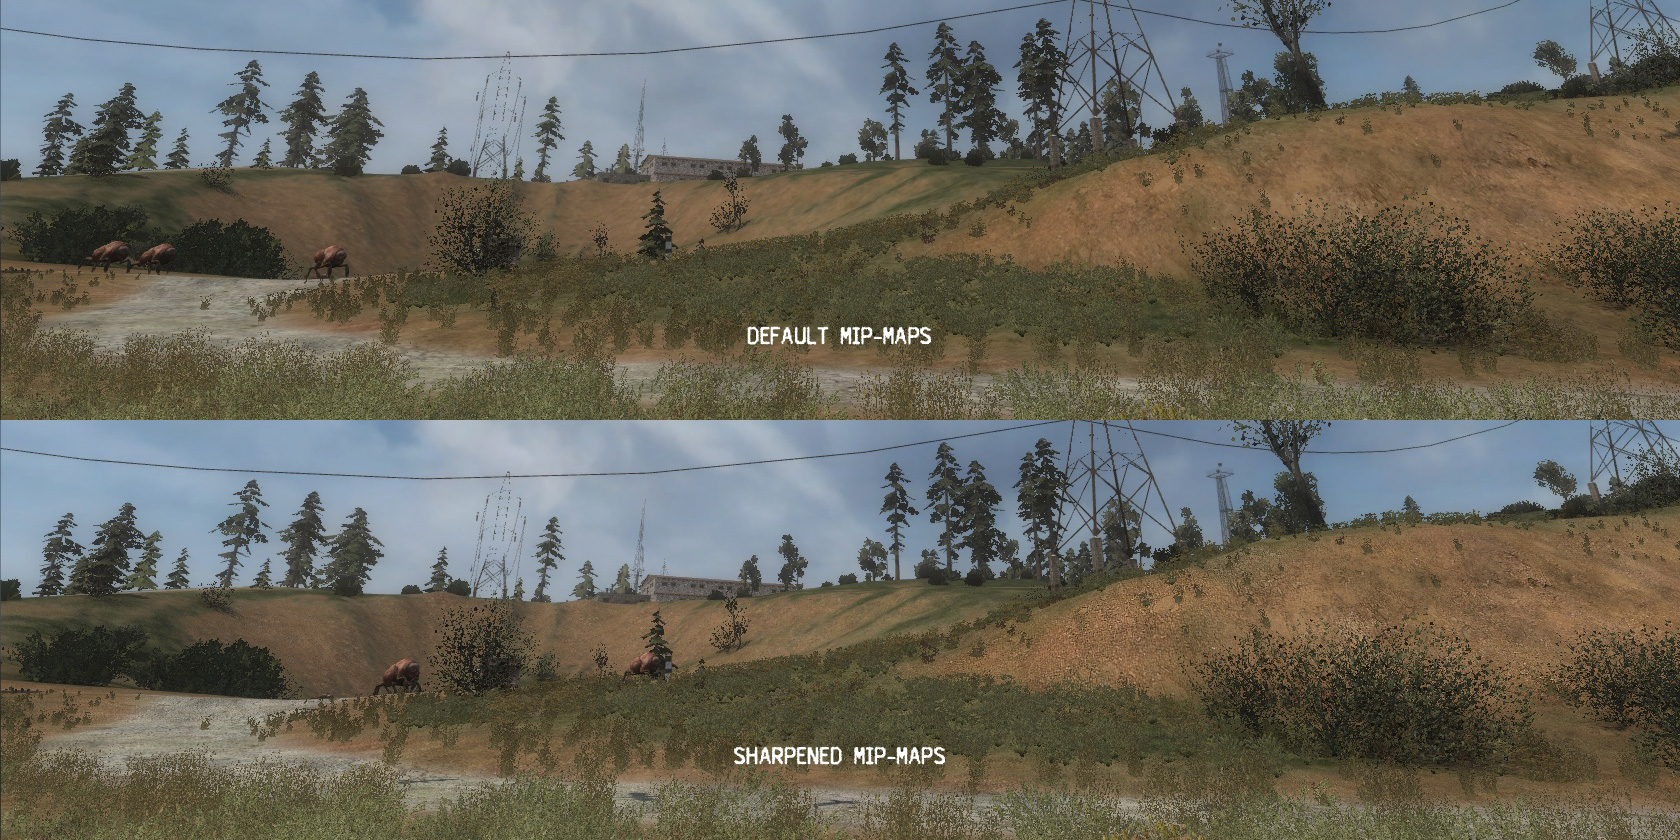
One issue with mip-mapping is that objects or terrain further in the distance begin to lose a lot of detail and have more of a smoother look. The sand in Journey needs to have more of a grainy look, so sharpened mip-maps were used to bring out the detail and texture of the sand in further distances. 

Sharp mip-maps off


Sharp mip-maps on

- Specular glitter


When I first saw the game, what stood out to me the most was the glittering sand effect. Naturally, sand is comprised of rocks and minerals that reflect like sharp crystals shining specular sun light into our eyes giving that glitter effect.


Most of the sand texture was derived from noise normal maps. This was used bring out the specular detail of individual grains of sand. 

- Anisotropic masking

The effect had an issue though, some parts of the terrain had an unusual concentration of glitter which gave an unnatural feel. 


To solve this, a mip-mapped texture containing values based on distances from the camera filters out the inappropriate specular highlights. 


And that's most of it, the rest include fluid simulation, a dust system and bloom. 

This is my 10th and final post and I would like to mention that I've learned so much over the past year. Computer graphics is truly amazing and you don't need to be a mathematician to do it, games like Journey have inspired me to really dive into it. This year I didn't really have too much time as I liked on shaders, building a 3D game from scratch and incorporating all of the functionality was a challenge. However, next year we get to use a pre-built game engine and I definitely plan to give shaders a lot of attention and create a beautiful game. 

Thank you for reading :)

Sunday 23 March 2014

UOIT Game Dev - Development Blog 9 - Motion Blur

So this week we've covered motion blur in games, which is pretty interesting. I've always had an idea but never really understood how it was properly done. When objects move fast in a scene, or when the viewer camera moves at a quick pace objects in scene become blurry. When you record something with a camera and quickly rotate it, the image will have a quick horizontal blur effect.

This is because when a camera captures incoming light, depending on the shutter speed, the image sensor will be exposed to light for a period of time. When an object moves quick enough, you are essentially exposing the camera to multiple frames which become blended together and averaged. The objects or pixels that remain roughly in the same position become clearer than the rest when averaged.


How do we do it in games?

- Old fasion way.

Simulate real life, create a buffer that takes in multiple frames over a period of time and average it. Last frame will have the highest weight for blending. It's basically emulating how a normal camera would function, we record a number of frames of an interval, and slowly over time each frame will become less visible. Although practical, this method is obviously very inefficient and can be slow as a number of frames need to be rendered.


- Modern way

We have something called motion or velocity vectors, and we basically take a few things into account. In the first pass we extract each pixel position from the current scene, then we take those positions, transform it from screen space back to world space with the inverted camera view projection matrix, then we use the previous camera view projection matrix to get the pixel at the previous frame's position. So we have 2 versions of the pixel, 1 in the last frame's position and the one in the current frame's position. We simply take the difference of the two and that would give us a velocity vector or the direction and length of the blur for that pixel.

I was really excited to try to implement this technique as it seemed pretty straight forward. I think this technique would really compliment out quick paced GDW game.

Unfortunately, this turned out to be a lot more difficult than I thought. My implementation looked awful and the screen jitters strangely. There was probably something wrong in transforming the pixel locations or related calculations. Oh well..


On the bright side though, I did come up with a makeshift simple motion blur shader that doesn't take the pixel position into account and does a cool sweep blur when you turn the camera quickly. It doesn't require 2 passes and looks pretty nice anyway.


Sunday 16 March 2014

UOIT Game Dev - Development Blog 8 - The Portal Challenge

So this week instead of another lecture, we were given a challenge. And that challenge was to create functioning portals from the game Portal in 1 hour and 30 minutes. This was a very interesting challenge since prior to that class I wasn't able to successfully render FBO textures to 3D quads.

So we formed a group of 4 and began to brainstorm thoughts. First thing was to get an actual quad in there, so all I did was model a plane in Maya and imported it into my game. Then we tried to render "something" onto that plane, we wanted to have the quad display the scene from our camera's perspective.

What I did next was use my HDR shader class to render the scene to an FBO texture. I drew the scene in the first pass to get the scene texture, then render it again with the quad's texture replaced with the FBO texture.

What happened next was weird. Although we were able to render something on the quad, the texture looked really stretched, all we could see were lines of colour. It took us about 10 minutes to figure out what was wrong and it turned out to be the way we declared the texture parameters for our FBO texture. I replaced the parameters with the same ones we used to load our texture for the models and it worked flawlessly.

So with that out of the way we wanted 2 portals with each of them displaying the scene. This was really simple as we simply repeated step1.

Now how do we make it so one portal displays what ever the other portal is looking at? hmm....
Well this requires more passes and saved camera transformations.

We saved the initial camera matrix prior to rendering, took our camera and set it up on Portal A's position and view then rendered the scene. We did the same with Portal B and now there are 2 scene textures available rendered at 2 different locations.

All we did for the final render pass was apply Portal B's scene texture to Portal A and vice versa.
This pretty much did the trick, however we still didn't have parallax working so it seemed strange to have the portal display a static image.

But luckily this was an easy fix, we simply took the directions from the camera to each of the portal positions, found out the angle of the direction, then rotated it about 180 degrees to face the player. This was the final tweak that allowed us to come up with a functioning portal (other than the actual physics part lol).


On the development side, I've finally decided to implement tangent space normal mapping. It added a lot more detail to our map and looks pretty nice. Also, Gimp's normal mapping plugin is amazing and pretty much allowed me to make normal maps in less than a minute. 


Well, that's all for this week. Our game is near beta, we should have all of the functionality done by next week. 


Sunday 9 March 2014

UOIT Game Dev - Development Blog 7 - Road to Alpha

The progress so far...

After all of the assignments and midterms being thrown at us in the third month, I have finally found some time to work on our game once again. There is roughly 3 weeks left and a lot of things still need to be implemented. Thankfully, we have done the majority of the gameplay in the past week and have a lot of the core mechanics working as well.

I have finished up our night level "Nightfall" which should be the second map the player plays during the campaign.

The enemies are properly implemented with path following and chase behaviours. I have implemented a Game Manager class that will take care of managing things like (enemy spawn locations, wave wait time, wave count, when to end the wave and camera). Each wave, the game manager will spawn more enemies with higher stats and will also determine how many waves until the player is completed the level.

In terms of mechanics for our character, I've decided to take some inspiration from one of my favourite childhood games "GunZ: the duel". In it the player can do things like wall run and roll which makes the gameplay really fast paced and fun. So now our character can roll in any direction and also run a long walls which is pretty neat.

In addition, we have added turrets to our level, the player may spawn turrets to aid in battle once they have the required amount of resources. These turrets will aim and shoot at nearby enemies when intersecting the attack radius.

Lastly for aesthetic purposes, I have made use of our particle system to create a volumetric fog-like effect. It worked out pretty nicely and makes the overall map look a lot better.


We now have a few things left to do:

- get our card system working
- add in the additional enemies and their behaviours
- add in the 2 last weapons
- have a function generator or nexus for the player to defend
- work on the other levels (shouldn't be difficult once we have all of the mechanics in place)
- tighten up the graphics on level 3 https://www.youtube.com/watch?v=BRWvfMLl4ho